- English
- Español
- Português
- русский
- Français
- 日本語
- Deutsch
- tiếng Việt
- Italiano
- Nederlands
- ภาษาไทย
- Polski
- 한국어
- Svenska
- magyar
- Malay
- বাংলা ভাষার
- Dansk
- Suomi
- हिन्दी
- Pilipino
- Türkçe
- Gaeilge
- العربية
- Indonesia
- Norsk
- تمل
- český
- ελληνικά
- український
- Javanese
- فارسی
- தமிழ்
- తెలుగు
- नेपाली
- Burmese
- български
- ລາວ
- Latine
- Қазақша
- Euskal
- Azərbaycan
- Slovenský jazyk
- Македонски
- Lietuvos
- Eesti Keel
- Română
- Slovenski
- मराठी
- Srpski језик

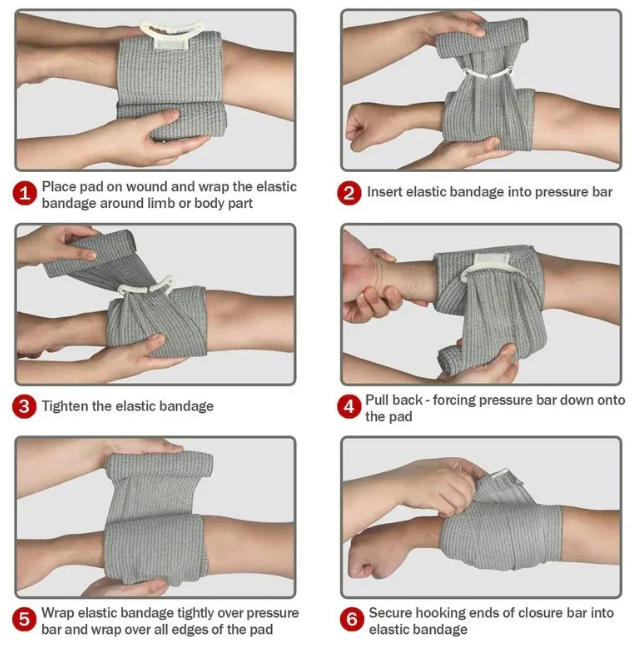
Emergency Bandage usage steps
Emergency Bandage usage steps
6 Key Steps
Safety Assessment and Wound Exposure: Ensure safety at the scene and apply simple hemostasis (direct pressure) if necessary. Cut/tear clothing to identify the bleeding point and amount.
Positioning Pad: Place the center of the pad directly over the bleeding point. For puncture wounds, the pad should provide sufficient coverage and even pressure.
Initial Fixation: Tighten the bandage and wrap it around the limb 1–2 times to secure the pad and establish initial tension.
Attaching the Pressure Bar (Key to Pressure): Pull the bandage over the pressure bar to form a lever, then fold it back onto the pad. You should feel a noticeable increase in pressure and a decrease in bleeding.
Continue wrapping and adjusting tension: Continue wrapping, ensuring each turn is secure and without noticeable wrinkles or gaps. Adjust the pressure again if necessary.
Secure with fasteners: Finally, secure the end of the bandage with the fasteners. Check that the pressure is maintained and that the end does not spring back.
3 Key Points (Most Common Mistakes Made on-site)
Sufficient and consistent pressure: After applying the initial pressure, maintain tension with subsequent wrappings. If the pad is soaked with blood, do not lift it to check; continue applying pressure and wrapping.
Avoid drifting: When wrapping, use your palm to stabilize the center of the pad to prevent it from drifting further away from the bleeding point.
Make sure the fastener is securely fastened: If it's not properly secured at the end, it can easily come loose during movement, leading to further bleeding
Previous:Crepe Bandage-two type